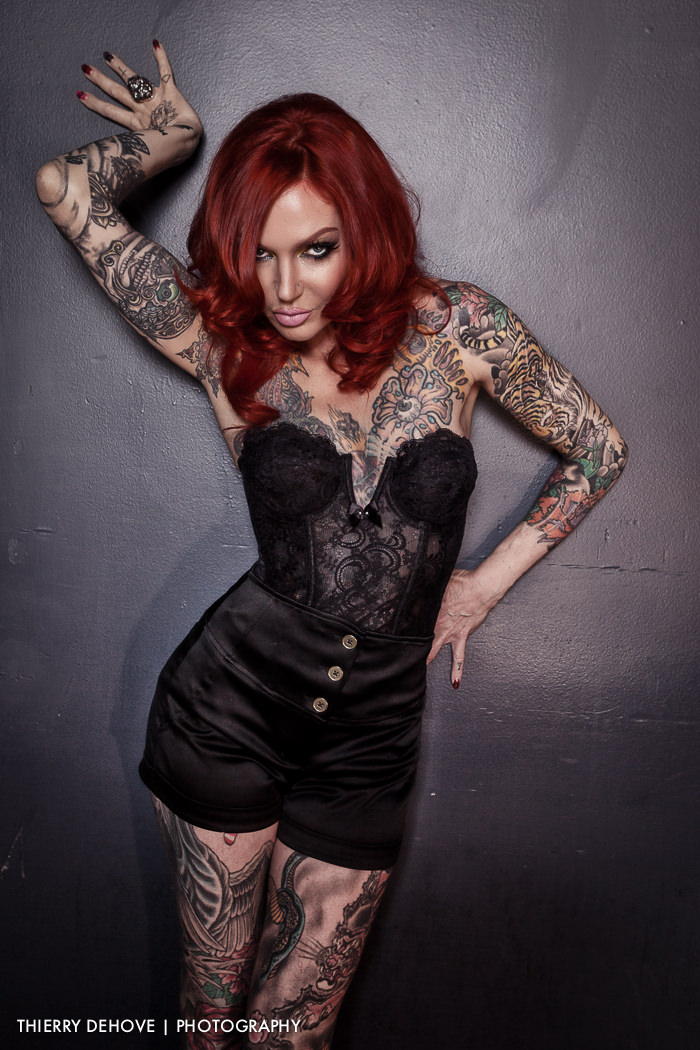
Lea Vendetta with Octagonal Softbox Westcott edited with Nik Software Color Efex Pro 4
Lighting Lea Vendetta with Octagonal Softbox Westcott edited with Nik Software Color Efex Pro 4
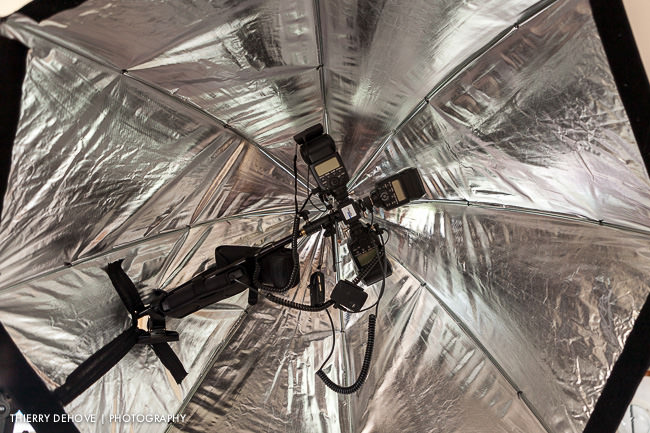
To create this image of Lea Vendetta, I used an Octagonal Softbox from Westcott, 43″ inch / 1.1 m built on an umbrella frame, so it is quick to set-up and tear-down. With an Impact light stand + Photoflex arm, I added 3 speed lights Canon 580EX II, mounted with a Lastolite TriFlash Bracket by Joe McNally, with unique rotating shoes for all 3 flashes. All flashes were in Manual and trig with 3 x ELS Universal SPEED Receiver. See the photo below for details.
The Westcott 43″ Apollo Orb is a perfect tool to transform your strobe light (up to 500W) or Speedlight into the perfect light source for portraiture. And you don’t need an adapter ring for your strobe head and flash, just open and fold it like a compact umbrella (it folds to 36″ length). This softbox opens as an Octagonal of 43 inches – it’s a huge source of light, perfect for portraits of between1 to 5 people. I find it easy to carry as it has the portability of an umbrella. It measures 43 inches wide by 24 inches deep. It has a solid construction with Velcro to add a 40-degree grid to eliminate spill and flare and also to create separation and depth. Four zippers at the bottom are the only stinger; I find them too short if you want to get more rotation tilt.
When you add the diffuser, you get a delicious light with soft shadows. This gives your model a round catch light in their eyes, simulating the effect of sunlight. It is definitely more efficient than my Lastolite Ezybox Hot Shoe Softbox 21″ and even my EXD 400 strobelight.
Workflow with Nik Software Color Efex Pro 4
My editing always starts with Adobe Photoshop Lightroom and I follow the same routine each time. I transform my sources from RAW to DNG images, go to Lens Corrections to apply the profile of my lens and Color to remove the chromatic aberration, add sharpening, (about 50% of the amount) and go to the top basic panel to work with highlights, shadows, whites and blacks.
This last part is where I spent most of my time and it’s not more than 5/8 minutes, and I get the base of my image, then I go to Presence to add clarity and vibrancy. It’s about what you are feeling and what look and feel you wish to give to your image. That’s it. 😉
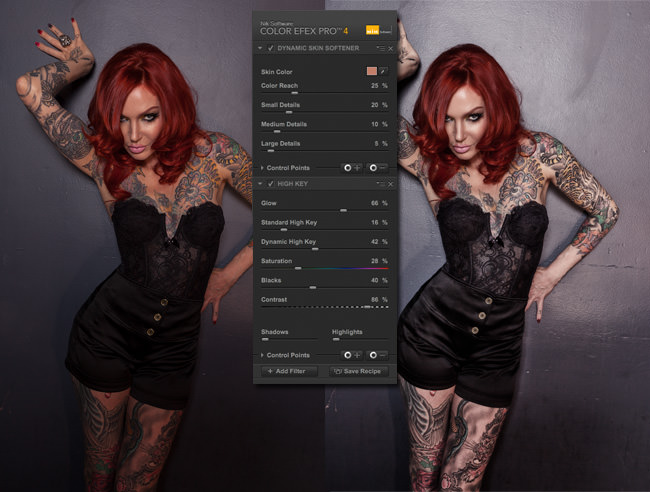
More and more I am using Nik Software Color Efex Pro 4 to edit my images. From Adobe Photoshop to Lightroom, or even Aperture, the workflow is the same. Open your image via Color Efex Pro from the filter menu to get the Color Efex interface. On your left side you can see 55 powerful and versatile filters classified by category. On the right side are all the adjustments, controls you can change and apply to your image on the middle. Just click on one of the filters to check the look and another filter to see a different look, fast and easy. On the right side, play with the sliders to accomplish what you are looking for. Afterwards I play with the U Point technology by adding control points. If, like me, you have been using Photoshop for a long time, it can take a while to understand this U Point Technology. This workflow can be surprising but I promise you after a few hours of practice, you won’t want to build layers or use masking anymore. With these control points, you can enhance, adjust and control your image directly with precision on the pixels. It’s extremely specific and you can add as many control points as you want.
On the final image, you can see that Lea asked me to emphasis the white color of her skin. So the first thing I did was to apply dynamic skin softener, a very powerful filter to soften the skin. When I select an area of my model, I try to choose a clear part of her skin. Next I applied high key to get this white washed effect. Click on save afterwards and don’t forget you can save your settings by creating recipes. Just click on the right side, under your filter ‘save recipe’, give it a name et voila – you will find your recipes in ‘custom recipes’, left-hand side.
Back to Lightroom, I just play with the adjustment brush to clean her eyes, a small vignette with Effect panels at the bottom, right after Lens Corrections. Now my image is done.
Shot on location at SoLita restaurant in Delray Beach, Florida, with my Canon 5D Mark II + Canon lens 24-70 f/2.8 + Skyport SPEED Transmitter, 1/100 sec at f/6.3 and 30 mm, ISO 100.
Et voila, I hope this helps, to see more of photos of Lea, click here
Posted March 2013
© Thierry Dehove Photography. All rights reserved. These images, or derivative works, can not be used, published, distributed or sold without written permission of the owner.


